MIT recurring payments
A recurring payment (or repeated payment) enables you to accept a payment and debit money in the following ways:
- With a token, without involving the user, those recurring payments are called Merchant Initialized Transaction (MIT).
- Requesting 3D Secure verification from the user, those recurring payments are called Customer Initialized Transaction (CIT).
This page only overlooks the MIT recurring payments.
Learn more about CIT recurring payments >
Recurring payments are currently supported for bank cards and the methods below. Other options will be available later.
How to make recurring payments via FPS >
How to make recurring payments via SberPay >
How to make recurring payments via T-Pay >
How to make recurring payments via YooMoney >
How to create a recurring payment
- Obtain the user's consent to recurring payments.
- Perform a successful payment that will recur, and get a token.
- Perform payments using this token.
User consent
Why you need it
Recurring payments are pre-authorized by a user and can be made without any future confirmation from them. The user only sees funds debited from their card. This is why you assume full responsibility for such payments: their amount, frequency, and user's consent to them.
You need user's consent for dispute situations (e.g. if the user complaints about an unauthorized debit).
How to obtain user's consent
You can do it in any way you find convenient. The main point is that you need to verify the user had been aware of automatic debits when they made the first payment, and agreed to them.
How to do it:
- Describe the payment terms to make sure the user will read them.
- Ask the user to confirm they understand and agree to the terms (e.g. add an unambiguous checkbox like Save card, Enable automatic payments, Enable recurring donations, etc.).
If the user checks the box, thus verifying their consent, recurring payments become enabled. If they don't, recurring payments are not activated.
The checkbox can be on your side (in this case, you will decide how it looks and where it is located) or on our side—in our payment widget.
Token for recurring payments
You need to perform one payment successfully, selecting the option to save bank card details. In response to this payment, you will receive a token. This token can be saved and used to accept future payments.
How to get a token
When creating a payment session
Send recurrent=true (in payment_options).
You can do this when creating a payment session or in any payment request.
If such a payment is successfully performed, you will receive a token for recurring payments with which you will be able to repeat the payment.
In this case, you need to get the user's consent on your side beforehand.
In our payment widget
If you perform a payment with the widget, you can show the I agree to recurring payments checkbox to the user.
If the user ticks this checkbox and the payment is performed successfully, you will receive a token for recurring payments.
If the card is changed, get a new recurring token.
Token statuses
When you create a token, it becomes active (is_active: true) and you can perform payments with the token.
If a token is inactive (is_active: false) or expired, the payment will not be processed and you will see an error.
How to learn the token status
Send a token/info request. In the type parameter, pass recurrent_token, in the recurrent_token.token parameter, pass the token.
In return, you will get info with the date of token expiration (finished_at) and status (is_active). The token expiration setting (finished_at) isn't processed by the Bank, i.e. the token will remain active even after the specified expiration date.
If is_active: true, you can perform payments with this token. Please note that an active token won't guarantee a successful payment, since the payment can be, for some reason, rejected by the card issuer.
How to disable a token
If you don't want to use a token for payments anymore (e.g. a user disabled recurring payments), send a recurrent/disable request.
In response, you will receive recurrent. If is_active: false, it means the token is disabled and you cannot perform payments with this token anymore.
After the token is disabled, the token expiration setting (
finished_at) may contain a date of the year 2000. This value won't affect anything, so please disregard it.
How to accept recurring payments
Step 1. Successfully perform a payment with an instruction to create a token
- Without our widget
- With our widget
When creating a payment session or sending a payment request, pass true in the recurrent parameter of the payment_options object.
Example of a payment request with an instruction to create a token
- cURL
- PHP
curl -X POST \
  https://demo.bank131.ru/api/v1/session/init/payment \
  -H 'Content-Type: application/json' \
  -H 'X-PARTNER-PROJECT: your_project_name' \
  -H 'X-PARTNER-SIGN: signature' \
  -d '{
    "payment_details": {
      "type": "card",
      "card": {
        "type": "bank_card",
        "bank_card": {
          "number": "4242424242424242",
          "expiration_month": "01",
          "expiration_year": "22",
          "security_code": "087"
        }
      }
    },
    "amount_details": {
      "amount": 10000,
      "currency": "rub"
    },
    "customer": {
      "reference": "lucky"
    },
    "payment_options": {
      "recurrent": true
    }
  }'
use Bank131\SDK\API\Request\Builder\RequestBuilderFactory;
use Bank131\SDK\Client;
use Bank131\SDK\Config;
use Bank131\SDK\DTO\Card\BankCard;
use Bank131\SDK\DTO\Customer;
use Bank131\SDK\DTO\PaymentOptions;

$config = new Config(
    'https://demo.bank131.ru',
    'your_project_name',
    file_get_contents('/path/to/your/private_key.pem')
);

$client = new Client($config);

$paymentOptions = new PaymentOptions();
$paymentOptions->setRecurrent(true);

$request = RequestBuilderFactory::create()
    ->initPaymentSession()
    ->setCard(new BankCard('4242424242424242', '01', '22', '087'))
    ->setAmount(10000, 'rub')
    ->setCustomer(new Customer('lucky'))
    ->setPaymentOptions($paymentOptions)
    ->build();

$response = $client->session()->initPayment($request);
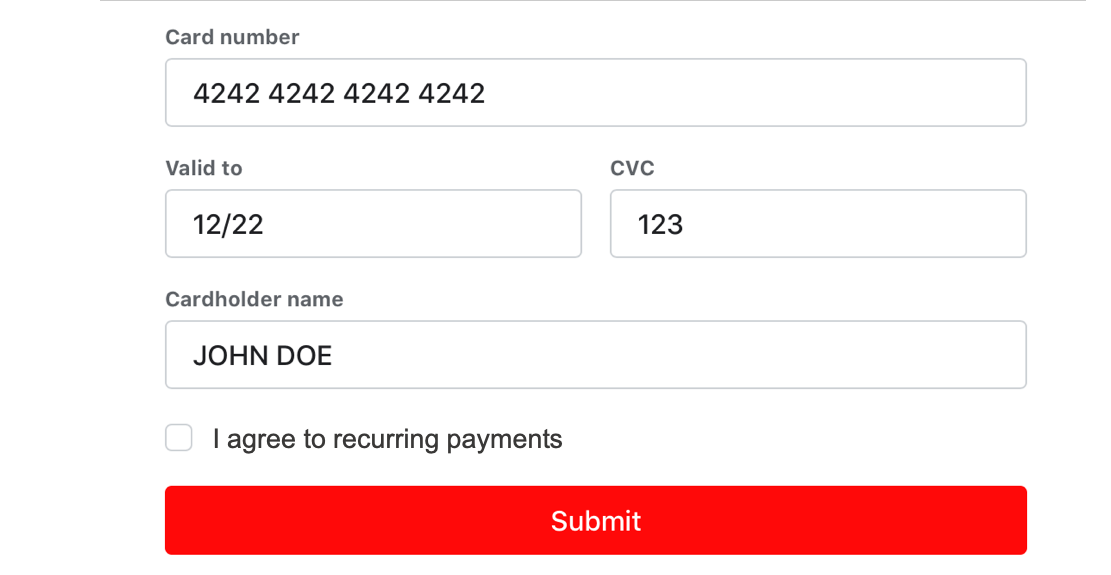
If you perform a payment with our widget, you can show the user the I agree to recurring payments checkbox.
To do this, in the widget token creation request, pass true in the show_recurrent_checkbox field.
This is optional. You can obtain the user's consent earlier, pass
recurrent: truewhen creating a payment session, and show the user the widget with no checkboxes—the same as for one-time payments.
Example of creating a token for the widget with a checkbox to agree to recurring payments
curl -X POST \
  https://demo.bank131.ru/api/v1/token \
  -H 'Content-Type: application/json' \
  -H 'X-PARTNER-PROJECT: your_project_name' \
  -H 'X-PARTNER-SIGN: signature' \
  -d '{
    "acquiring_widget": {
      "session_id": "ps_34851",
      "show_recurrent_checkbox": true
    }
  }'
Then, create a payment form with this token.
If the user ticks the I agree to recurring payments checkbox (i.e. agrees to enable recurring debiting from their card), you will receive a token.
Example of a widget with an option to enable or disable recurring payments
Step 2. Save the token
If the payment is performed successfully (and the user enables recurring debiting when paying through the form), you will get the token in the payment_finished webhook.
Webhook example
curl -X POST \
  https://partner.ru \
  -H 'content-type: application/json' \
  -H 'X-PARTNER-SIGN: signature' \
  -d '{
    "type": "payment_finished",
    "session": {
      "id": "ps_3230",
      "status": "accepted",
      "created_at": "2018-05-27T02:03:00.000000Z",
      "updated_at": "2018-05-27T02:03:00.000000Z",
      "acquiring_payments": [{
        "id": "pm_2705",
        "status": "succeeded",
        "created_at": "2018-05-27T02:03:00.000000Z",
        "finished_at": "2018-05-27T02:03:00.000000Z",
        "customer": {
          "reference": "lucky"
        },
        "payment_details": {
          "type": "card",
          "card": {
            "brand": "visa",
            "last4": "4242"
          }
        },
        "recurrent": {
          "token": "feda2b2106a2e8747bbdc4c9f53c7f5f6ab845ffa1b7cc68ca839720af99b3d1",
          "created_at": "2020-07-14T13:17:11+03:00",
          "finished_at": "2020-07-31T16:05:42+03:00",
          "is_active": true,
          "type": "recurrent_token"
        },
        "amount_details": {
          "amount": 10000,
          "currency": "rub"
        },
        "payment_options": {
          "recurrent": true
        }
      }]
    }
  }'
Step 3. Accept payments using the token
Send a request to accept a payment with the recurrent payment type. Instead of a bank card, pass the token you saved after the previously accepted payment.
Example of a request for a recurring payment
- cURL
- PHP
curl -X POST \
  https://demo.bank131.ru/api/v1/session/init/payment \
  -H 'Content-Type: application/json' \
  -H 'X-PARTNER-PROJECT: your_project_name' \
  -H 'X-PARTNER-SIGN: signature' \
  -d '{
    "payment_details": {
      "type": "recurrent",
      "recurrent": {
        "token": "e9876f32bcd947f79c324cf2da5726304a894f6ae2037de7705fdb3e0a134d39"
      }
    },
    "amount_details": {
      "amount": 10000,
      "currency": "rub"
    },
    "customer": {
      "reference": "lucky"
    }
  }'
use Bank131\SDK\API\Request\Builder\RequestBuilderFactory;
use Bank131\SDK\Client;
use Bank131\SDK\Config;
use Bank131\SDK\DTO\Customer;

$config = new Config(
    'https://demo.bank131.ru',
    'your_project_name',
    file_get_contents('/path/to/your/private_key.pem')
);

$client = new Client($config);

$request = RequestBuilderFactory::create()
    ->initPaymentSession()
    ->setRecurrentToken('e9876f32bcd947f79c324cf2da5726304a894f6ae2037de7705fdb3e0a134d39')
    ->setAmount(10000, 'rub')
    ->setCustomer(new Customer('lucky'))
    ->build();

$response = $client->session()->initPayment($request);