Payments by bank cards
This scenario describes how bank card payments are accepted and processed by services having the technical capacity to collect and store card details on their side.
If you decide not to collect bank card details and not to store them on your side, accept payments using our payment form.
This scenario does not include the payment capture step. How to make a delayed capture payment
-
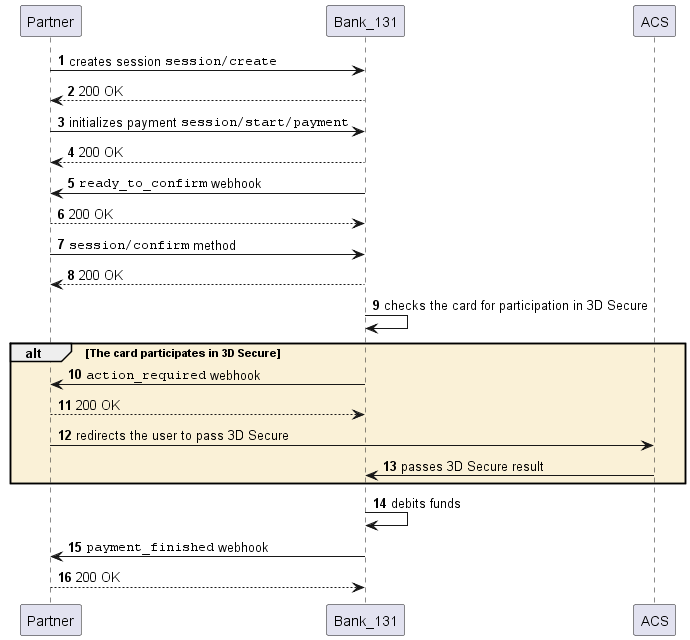
Create a payment session (
session/create). You will receive a payment session identifier in response.Alternatively, you can use the
session/init/paymentmethod. In this case, specify all the payment parameters right away and skip the next step.Creating a session
- cURL
- PHP
curl -X POST \https://demo.bank131.ru/api/v1/session/create \-H 'Content-Type: application/json' \-H 'X-PARTNER-PROJECT: your_project_name' \-H 'X-PARTNER-SIGN: signature' \-d '{"customer": {"reference": "user123","contacts": [{"email": "user@gmail.com"}]},"amount_details": {"amount": 10000,"currency": "rub"},"metadata": "order123"}'use Bank131\SDK\API\Request\Builder\RequestBuilderFactory;use Bank131\SDK\Client;use Bank131\SDK\Config;$config = new Config('https://demo.bank131.ru','your_project_name',file_get_contents('/path/to/your/private_key.pem'));$client = new Client($config);$request = RequestBuilderFactory::create()->createPaymentSession()->setAmount(10000, 'rub')->setMetadata('order123')->build();$response = $client->session()->create($request); -
Send a
session/start/paymentrequest.- In the
session_idparameter, pass the identifier of the session created in Step 1. - In the
typefield of thepayment_detailsobject, specifycard. - In the
bank_cardobject, transmit user's bank card details.
Starting a payment
- cURL
- PHP
curl -X POST \https://demo.bank131.ru/api/v1/session/start/payment \-H 'Content-Type: application/json' \-H 'X-PARTNER-PROJECT: your_project_name' \-H 'X-PARTNER-SIGN: signature' \-d '{"session_id": "ps_3230","payment_details": {"type": "card","card": {"type": "bank_card","bank_card": {"number": "4242424242424242","expiration_month": "01","expiration_year": "26","security_code": "123"}}},"customer": {"reference": "user123","contacts": [{"email": "user@gmail.com"}]},"metadata": "good"}'use Bank131\SDK\API\Request\Builder\RequestBuilderFactory;use Bank131\SDK\Client;use Bank131\SDK\Config;use Bank131\SDK\DTO\Card\BankCard;$config = new Config('https://demo.bank131.ru','your_project_name',file_get_contents('/path/to/your/private_key.pem'));$client = new Client($config);$request = RequestBuilderFactory::create()->startPaymentSession('session_id')->setCard(new BankCard('4242424242424242','02','22','123','cardholder name'))->setCustomer(new Customer('lucky'))->setMetadata('good')->build();$response = $client->session()->startPayment($request); - In the
-
Wait for a
ready_to_confirmwebhook—this means that the payment can be performed and the Bank is waiting for you to confirm (or cancel).The webhook body will contain all the data needed for the payment, which you need to check.
You then reply with the 200 HTTP code.
Webhook example
- cURL
- PHP
curl -X POST \https://partner.ru \-H 'Content-Type: application/json' \-H 'X-PARTNER-SIGN: signature' \-d '{"type": "ready_to_confirm","session": {"id": "ps_3230","status": "in_progress","created_at": "2018-05-27T02:03:00.000000Z","updated_at": "2018-05-27T02:03:00.000000Z","acquiring_payments": [{"id": "pm_2018","status": "pending","created_at": "2018-05-27T02:03:00.000000Z","customer": {"reference": "user123","contacts": [{"email": "user@gmail.com"}]},"payment_details": {"type": "card","card": {"last4": "4242","brand": "visa"}},"amount_details": {"amount": 10000,"currency": "rub"},"metadata": "good"}]}}'use Bank131\SDK\Client;use Bank131\SDK\Config;use Bank131\SDK\Services\WebHook\Hook\WebHookTypeEnum;$config = new Config('https://demo.bank131.ru','your_project_name',file_get_contents('/path/to/your/private_key.pem'),file_get_contents('/path/to/bank131/public_key.pem'));$client = new Client($config);$hook = $client->handleWebHook('sign from headers', 'request body');if ($hook->getType() === WebHookTypeEnum::READY_TO_CONFIRM) {$session = $hook->getSession();//do your logic here} -
Confirm (
session/confirm) or cancel (session/cancel) the payment.Confirming the session
- cURL
- PHP
curl -X POST \https://demo.bank131.ru/api/v1/session/confirm \-H 'Content-Type: application/json' \-H 'X-PARTNER-PROJECT: your_project_name' \-H 'X-PARTNER-SIGN: signature' \-d '{"session_id": "ps_3230"}'use Bank131\SDK\Client;use Bank131\SDK\Config;$config = new Config('https://demo.bank131.ru','your_project_name',file_get_contents('/path/to/your/private_key.pem'));$client = new Client($config);$response = $client->session()->confirm('session_id');Canceling the session
- cURL
- PHP
curl -X POST \https://demo.bank131.ru/api/v1/session/cancel \-H 'Content-Type: application/json' \-H 'X-PARTNER-PROJECT: your_project_name' \-H 'X-PARTNER-SIGN: signature' \-d '{"session_id": "ps_3230"}'use Bank131\SDK\Client;use Bank131\SDK\Config;$config = new Config('https://demo.bank131.ru','your_project_name',file_get_contents('/path/to/your/private_key.pem'));$client = new Client($config);$response = $client->session()->cancel('session_id'); -
If the user's card requires 3D Secure, Bank 131 will send you an
action_requiredwebhook with redirection details in thecustomer_interaction.redirect.urlfield. Redirect the user.Webhook example
- cURL
curl -X POST \https://partner.ru \-H 'Content-Type: application/json' \-H 'X-PARTNER-SIGN: signature' \-d '{"type": "action_required","session": {"id": "ps_3230","status": "in_progress","created_at": "2018-05-27T02:03:00.000000Z","updated_at": "2018-05-27T02:03:00.000000Z","acquiring_payments": [{"id": "pm_131","status": "pending","created_at": "2018-05-27T02:03:00.000000Z","customer": {"reference": "user123","contacts": [{"email": "user@gmail.com"}]},"payment_details": {"type": "card","card": {"brand": "visa","last4": "8801"}},"amount_details": {"amount": 15000,"currency": "rub"},"customer_interaction": {"type": "redirect","redirect": {"url": "https://bank131.ru?foo=bar","base_url": "https://bank131.ru","method": "POST","qs": {"foo": "bar"},"params": {"paReq": "sdfew^//asdhbv","MD": "abc75daefnn"}}}}]}}'Handling the webhook using SDK
- PHP
use Bank131\SDK\Client;use Bank131\SDK\Config;use Bank131\SDK\Services\WebHook\Hook\WebHookTypeEnum;$config = new Config('https://demo.bank131.ru','your_project_name',file_get_contents('/path/to/your/private_key.pem'),file_get_contents('/path/to/bank131/public_key.pem'));$client = new Client($config);$hook = $client->handleWebHook('sign from headers', 'request body');if ($hook->getType() === WebHookTypeEnum::ACTION_REQUIRED) {$session = $hook->getSession();//do your logic here} -
Wait for a
payment_finishedwebhook or request the payment status using thesession/statusmethod.The result of the payment can be found in the
statusfield of theacquiring_payments/payment_listarray.If the status is
succeeded, then the payment has been successful. If the status isfailed, then the payment has not been completed because of an error.
Payment without a payment form